Hi, when trying to update from Flair 3.2-1 to 3.2-2, I experienced the same issue as that described in this topic, thus I tried applying the same solution provided there. However, after removing flair and geoviewer as specified in the first two instructions, I got the following error when executing tar -xvf ./flair-geoviewer-3.2-2.tgz
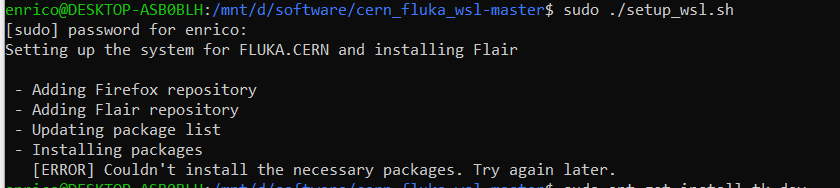
Therefore I thought, OK let me install Flair from scratch and to that purpose I downloaded the setup script as specified in this page. However, running the script gave this other error
the error you got (No such file or directory) simply means that the flair-geoviewer-3.2-2.tgz file is not there. Make sure to execute the command in the directory hosting the downloaded file (or move the latter).
Hi Francesco and thank you for the reply. I don’t know in which folder that file is hosted – actually I made a search and it is found nowhere in my disk. The solution posted by Marteen surely works, but it seems it needs a file I don’t have – why does the installation script, which I’d prefer to use, fail? I tried running it again right now (it said “Try again later”) and it still gives the same error.
Thanks a lot Francesco. Downloaded and extracted it, but now the following instruction tar -xvf ./flair-3.2-2 gives another error about non-existing file. Moreover, in the following I don’t know what I should use for the destination directory in make install DESTDIR=…/flair-3.2/ and also, being not proficient in Linux, how to add the installation directory to the path. Those are other reasons for me to prefer the installation script. I hoe someone helps me running it correctly.
What is the new error that you get when you try to untar the downloaded file?
The “make install” DESTDIR, has to be the directory where you have installed flair, which usually is /usr/local but of course, this would be different in your case.
The downloaded file untars correctly. The error when I run the command tar -xvf ./flair-3.2-2 is about a missing file, as shown in the following screenshot
It has to be downloaded too from flair.cern/download.html: flair-3.2-2.tgz.
Then the command should be tar -xzvf flair-3.2-2.tgz
These are the two installation files of Flair (including geoviewer).
both need to be “untar-ed” with the command “tar -xvzf <file>”. Be careful that your browser could unzip the file during the download.
I don’t know where exactly you have downloaded these files, anyway I assume that they are in the same directory.
After extracting the archives, you should have 2 directories:
flair-3.2
flair-geoviewer-3.2
At this point, in the directory flair-3.2 you already have a working version of flair (but without the geometry editor).
My suggestion at this point would be to move flair in the /usr/local directory. You can do this with the command:
sudo mv flair-3.2 /usr/local/.
I have added the “sudo” command because you need superuser rights to move the file there.
Then you can install the geometry editor:
 cd flair-geoviewer-3.2
 make clean
 make
 make install DESTDIR=/usr/local/flair
At this point, everything should work. You can test it from the command line starting flair:
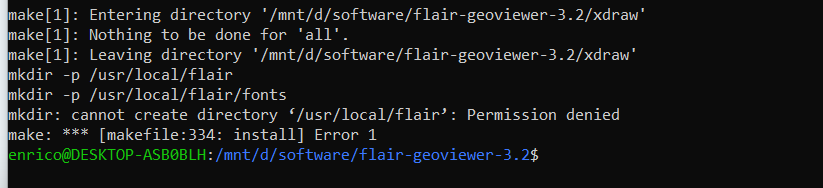
Thank you for the very detailed explanation – what I actually needed! Everything worked well, except for the last instruction, which gave an error as you can see in the screenshot
The problem is cause by the fact that the user “enrico” doesn’t have the rights to write in /usr/local/flair-3.2
You just need to add the sudo command:
Good. Let’s now try to finish in a clean way.
You need to add the path to flair to your PATH variable. It is possible to do it indicating the specific flair directory, i.e. flair-3.2, but this is not elegant. Plus, next time you install flair it won’t work anymore.
First, let’s go in the right directory:
cd /usr/local
Then we create a logical link to the flair-3.2 directory and name it flair:
sudo ln -s flair-3.2 flair
again, sudo is there because of the access rights.
Then we go back to your home directory.
cd
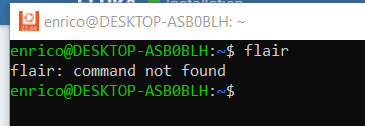
If you want to be super-sure, you can check again that flair works:
/usr/local/flair/flair
Now we need to add the right path to the PATH variable. You need to edit with your favorite text editor the file .bashrc
Somewhere in the file (probably at the end), you’ll find a line that looks like:
export PATH=$PATH:something:something_else
You simply have to add the path to flair like this: